Table of Contents
Ever stared anxiously at your cake in the oven, wondering, "Is it done yet?" The struggle is real! Knowing precisely when cakes are nearing doneness is a baking skill that separates the amateurs from the pros. This article is your secret weapon, guiding you through the art of identifying those crucial signs that signal your cake is almost ready to be crowned the star of your dessert spread. We'll explore the visual cues – from subtle color changes to the tell-tale signs of shrinking edges – and teach you the invaluable art of the touch test, allowing you to feel the cake's readiness. But we don't stop there! We'll also delve into advanced techniques that will elevate your baking game and ensure perfectly baked cakes, every single time. Get ready to unlock the secrets to flawless cakes, and say goodbye to overbaked disasters. Let's discover together how to tell when cakes are nearing doneness – and finally conquer the oven!
Visual Cues: Spotting the Signs of a Nearly Done Cake
Visual Cues: Spotting the Signs of a Nearly Done Cake
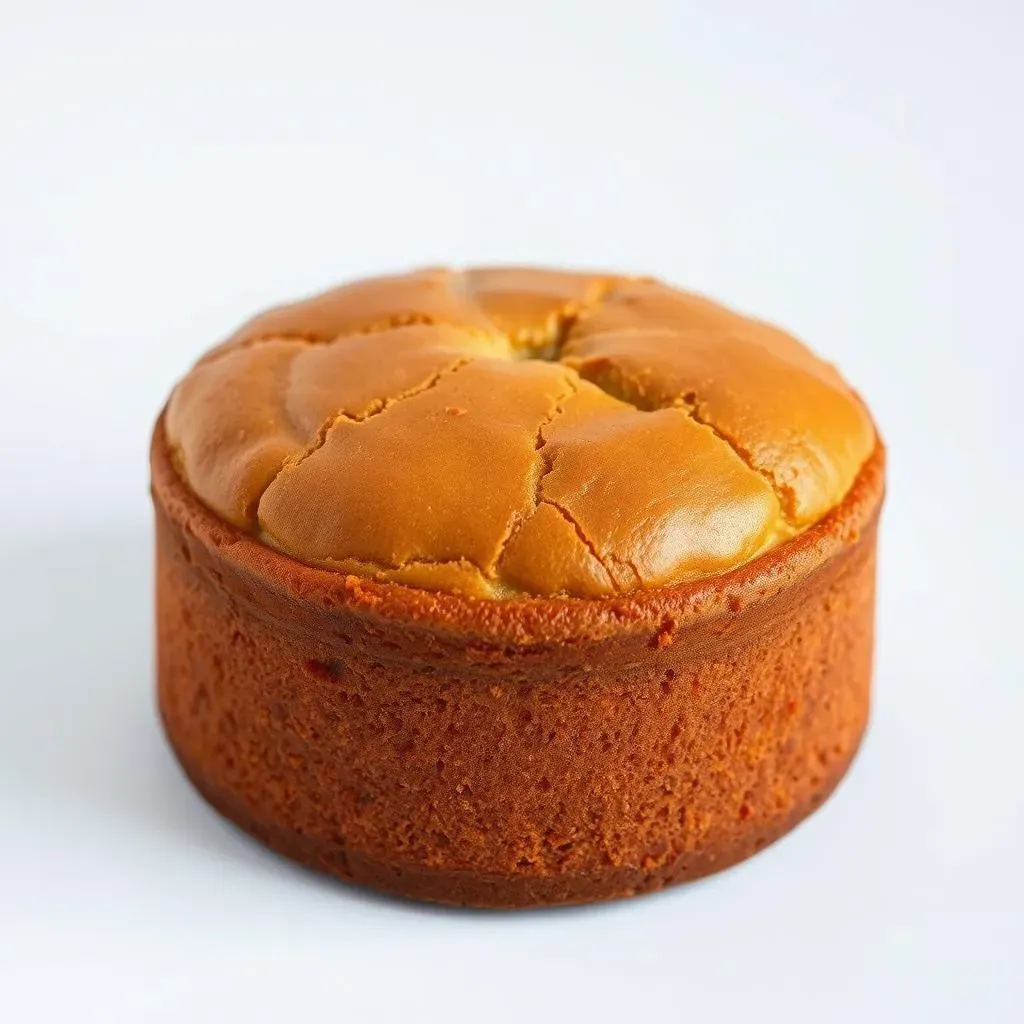
Let's talk visual cues! The most obvious sign is often the color. For lighter cakes like vanilla or white cake, look for a lovely golden-brown top. The edges will usually be a shade darker than the center. Think of it like a sunset – the edges are where the baking "sun" hits first and longest. For chocolate cakes, it's a bit different. They often have a more matte finish when done, rather than a glossy shine. Don't worry if your chocolate cake doesn't look like it's glowing – that's normal!
Another visual clue is the cake's interaction with the pan. As the cake bakes, it shrinks a little. This means you'll start to see a tiny gap between the cake edges and the sides of the pan. This is a great sign, indicating that the outer parts are fully baked and have started to pull away. It's like the cake is giving itself a little pat on the back, saying, "I'm almost done!" If you're baking a loaf cake, check out this guide on refrigerating cakes to ensure it bakes evenly. This visual cue is less reliable for cakes baked in springform pans or those with added ingredients that might affect shrinkage.
Cake Type | Visual Cue |
|---|---|
Vanilla/White Cake | Golden-brown top, darker edges |
Chocolate Cake | Matte finish, less glossy |
All Cake Types | Slight gap between cake and pan edges |
The aroma is also a fantastic indicator! You'll start to smell that amazing, irresistible cake scent wafting from the oven. This is a more subjective clue, of course, but trust your nose! Every type of cake has its own unique aroma, from the sweet vanilla of a classic sponge to the rich chocolate of a decadent fudge cake. If you're interested in exploring more cake recipes, you can check out this article on keto cakes.
Remember, these visual cues work best when used together. Don't rely on just one; instead, use them all to get a complete picture of your cake's progress. It's like solving a puzzle; each clue helps you piece together the answer – a perfectly baked cake!
- Look for golden-brown color (lighter cakes).
- Observe a matte finish (chocolate cakes).
- Check for a small gap between the cake and the pan.
- Trust your nose – that delicious cake smell is a good sign!
The Touch Test: Feeling for Doneness
The Touch Test: Feeling for Doneness
The Gentle Press
Okay, so you've checked the color and smelled the deliciousness. Now for the touch test! Gently press the center of your cake with a fingertip. If the cake springs back immediately, it's a good sign that it's done. Think of it like a bouncy ball – a well-baked cake will have a similar springy texture. If your finger leaves an indentation, your cake needs a few more minutes in the oven. Don't worry, it's not a race! We're aiming for perfection here. For more tips on getting that perfect bake, check out our guide on making moist keto cakes – the principles apply to all cakes!
- Gently press the center of the cake.
- If it springs back, it's likely done.
- An indentation means more baking time is needed.
Internal Temperature (With a Grain of Salt)
While many baking guides suggest using a thermometer, it's not always the most reliable method for cakes. The internal temperature can vary depending on the type of cake and your oven's quirks. It's a supplementary method, not a primary one. The touch test and visual cues are usually more reliable indicators of doneness. However, if you're feeling adventurous, a food thermometer can give you a general idea. Aim for around 210°F (99°C) in the center for most cakes, but remember – this is just a guideline. For more information on different kinds of cakes, consider checking out our post on what keto cakes are.
Method | Reliability | Temperature (approx.) |
|---|---|---|
Touch Test | High | N/A |
Visual Cues | High | N/A |
Thermometer | Moderate | 210°F (99°C) |
Beyond the Basics: Advanced Techniques for Perfect Cakes
Beyond the Basics: Advanced Techniques for Perfect Cakes
Panning for Gold: The Right Tools for the Job
Choosing the right pan makes a HUGE difference! A plain, uncoated metal pan distributes heat evenly, leading to a more consistent bake. Darker pans absorb heat faster, so you might need to reduce your baking time slightly. Non-stick pans can sometimes hinder browning, so keep that in mind. And don't forget about the size – using a pan that's too small will result in a cake that overflows and bakes unevenly, while one that's too large will lead to a flat, sad cake. Think of it like Goldilocks and the Three Bears – you need the pan that's *just right* for your recipe.
Another trick is using cake strips. These fabric strips, soaked in water, wrap around your cake pan, creating a more even baking temperature and preventing that dreaded dome-shaped top. They essentially act as a little temperature regulator, ensuring that the edges and center bake at a similar pace. For more tips on baking even cakes, check out our guide on refrigerating cakes for optimal results. It might sound weird, but it works wonders!
- Use a plain, uncoated metal pan for even baking.
- Adjust baking time for darker pans.
- Choose the correct pan size for your recipe.
- Consider using cake strips for even baking.
Oven Temperature: The Goldilocks Principle
Your oven's temperature can fluctuate, even if it's set correctly. An oven thermometer is your best friend here. Place it in your oven while it preheats to ensure it's actually reaching the temperature indicated on the dial. A slightly off temperature can significantly impact your cake's baking time and overall texture. If your oven runs hot, reduce the temperature by 10-20 degrees. If it runs cool, you might need to increase it a bit. This slight adjustment can be the difference between a perfect cake and a slightly dry or underbaked one.
Don't be afraid to adjust baking times based on your oven's quirks and your cake's progress. Most recipes give a time range rather than a precise number, so use your judgment! If your cake is browning too quickly, you might need to lower the temperature or cover the top with foil. If it's not browning enough, you might need to increase the temperature or uncover it to allow for more browning. Remember, practice makes perfect! For more cake inspiration, check out our article on keto zucchini cake.
Oven Issue | Solution |
|---|---|
Oven runs hot | Reduce temperature by 10-20 degrees |
Oven runs cool | Increase temperature slightly |
Cake browning too quickly | Lower temperature or cover with foil |
Cake not browning enough | Increase temperature or uncover |